How to Get Started Intro
In the EasyEDA Professional extension engine, all extensions are independent JavaScript scripts running under their own scope chains.
Each extension requires a UUID as the uniquely identifiable name of the extension, and this UUID exists in two cases:
- the extension has been included and referenced from the EasyEDA Pro Extension Store, or the extension developer has requested a UUID for the extension and filled in the
uuidfield inextension.json, in this case, the UUID is an auto-generated 32-bit string, and you can find it on the Extension Store page for the extension; - if the extension is not included and does not fill in the
uuidfield, then the UUID is thenamefield defined by the extension developer inextension.json, please be careful about using this field as the name of the extension's interdependent references as it is always variable and may be renamed.
INFO
If you are using pro-api-sdk, a new UUID will be automatically generated for you the first time you run npm run build.
If you wish to build the full development environment manually, you can also safely use as the UUID for the new extension, which is randomly generated when you visit the current page.
All user extensions run locally on the client, which means you can write them in JavaScript according to the ECMAScript Next specification, but note that in the main thread, there are limitations on accessing the DOM, external requests, local file system, and other browser APIs. However, it should be noted that in the main thread, calls to the DOM, external requests, local filesystem, and other browser APIs will be limited, and we will provide predefined interfaces in the extension APIs to address the need for this type of access.
TIP
EasyEDA offers a wide range of extension examples, allowing users to view the source code and compile it for use: Extensions source code: https://github.com/easyeda Extensions marketplace (China Site, the global site is under developing): https://ext.lceda.cn/
Development Environment (Computer)
In order to facilitate the environment configuration, we provide pro-api-sdk, and we recommend all developers to use this SDK for development, and this document will be based on this SDK to explain. You can get and configure the SDK environment in the following ways:
I. Install Visual Studio Code
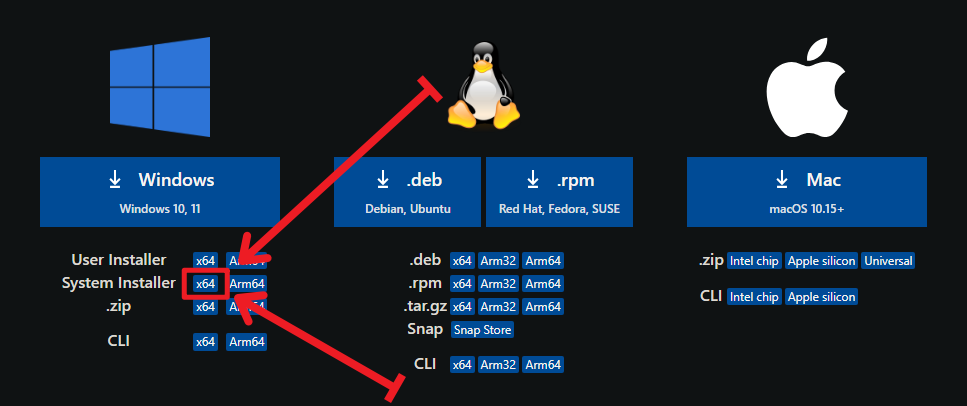
Visual Studio Code is the most recommended IDE for novice developers, hereafter referred to as VSCode, and you can download it from its official website.
If you don't understand the difference between the versions, please download the version indicated in the figure below (Windows System Installer x64):
II. Install Git
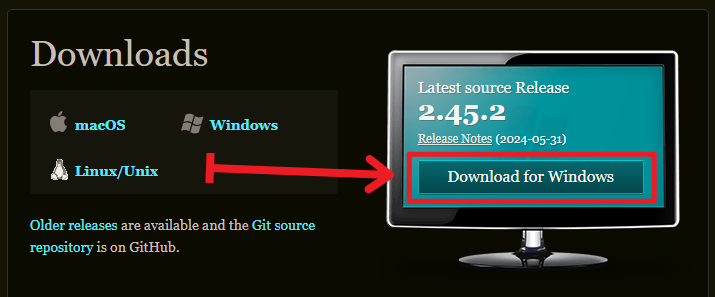
Git is the recommended tool for pulling SDKs, and you can download it from its official website.
On the right side of the official download page, click Download for Windows:
III. Install Node.js
Node.js is the runtime software necessary to build TypeScript natively, and you can download it from its official website.
The official download page is a guided interactive page, so if you don't need it, just follow the instructions below:
I want Current version of Node.js for Windows running x64
Then click the Download Node.js button to download the Node.js installer.
WARNING
If you wish to use a customized version of Node.js, make sure it is no lower than 20.5.0, which is the minimum version required for this project.
TIP
You can check the version of Node.js you have installed by typing node -v in the console, if the version is lower than 20.5.0, follow the steps above to install Node.js.
IV. Pulling SDK Repository Locally
Before you start pulling, you need to first create a subfolder on your local disc where you will keep all your development materials. For example, you can create a subfolder named
easyeda-extensionunder theD:disc.WARNING
Please try not to include
spacesnon-ASCII charactersin the path to avoid surprises in subsequent operations.Once created, open the Windows PowerShell tool (right-click on the
Windows Logo Keyand select theWindows PowerShell (Administrator)option).Navigate within Windows PowerShell to the folder you just created, in this case the
D:\easyeda-extensionfolder, and executecd "D:\easyeda-extension":
TIP
The double quotes
""here cannot be omitted when the path containsspaces.Depending on your network environment, execute one of the following commands:
shellgit clone --depth=1 https://github.com/easyeda/pro-api-sdk.git1
V. Get VS Code Extension
First you need to start VS Code and open the folder of the project you pulled in the previous stage inside it (e.g.
D:\easyeda-extension\pro-api-sdk).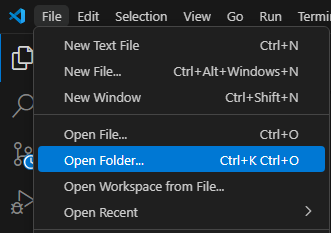
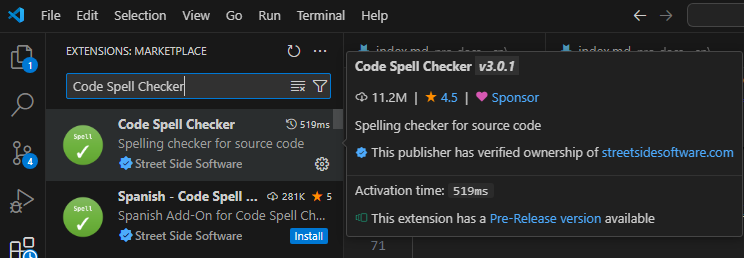
Then switch to the Extensions page (shortcut Ctrl + Shift + X) and search for and install the following apps in the search box at the top:
Code Spell Checkerby Street Side SoftwarePrettierby PrettierESLintby MicrosoftEditorConfig for VS Codeby EditorConfig
All extensions are pre-configured within the SDK and saved in their corresponding configuration files, and you don't need to do any additional configuration on them unless you understand what you're doing.
Build the First EasyEDA Professional Extension
I. List of Files
The SDK comes pre-configured with all the necessary components of the development environment, so you can refer to the following list of files to see what each one does:
├───.husky              Auto Script Directory
├───.vscode             VS Code Configuration File Directory
│   ├───extensions.json Recommended Extensions
│   └───settings.json   Extension Configuration
├───build               Extension Pack Compilation Directory
│   ├───dist            Extension Pack Compilation Result Directory
│   └───packaged.ts     Compile Scripts
├───config              ESBuild Configuration Directory
├───dist                Compilation Results Directory
├───iframe              IFrame Inline Frame Directory
├───images              Extension Preview Image Directory
│   ├───banner.png      Extension Banner Image
│   └───logo.png        Extension Logo Image
├───locales             Extended Multilingual Directory
│   ├───en.json         English Language Translation File
│   └───zh-Hans.json    Simplified Chinese Language Translation File
├───node_modules        NPM Dependency Module Directory
├───src                 Extension's Main Source Code Directory
├───.edaignore          EDA Ignore File Configuration
├───.editorconfig       Editor Base Format Configuration
├───.eslintrc.js        ESLint Automatic Code Constraint Configuration
├───.gitattributes      Git Attribute Configuration
├───.gitignore          Git Ignores File Configuration
├───.prettierignore     Prettier Ignores File Configuration
├───.prettierrc.js      Prettier Auto Format Configuration
├───LICENSE             Open Source License
├───README.md           Project Introduction
├───extension.json      EasyEDA Professional Extension Configuration
├───package.json        NPM Package Configuration
├───package-lock.json   NPM Package Dependency Locking Configuration
└───tsconfig.json TypeScript Compilation Configuration2
3
4
5
6
7
8
9
10
11
12
13
14
15
16
17
18
19
20
21
22
23
24
25
26
27
28
29
30
31
II. Extension Configuration
EasyEDA Professional has a custom configuration file, i.e. extension.json file in the root directory of the SDK, the contents of which will be fully read by EasyEDA Professional and will be shown in the display and running process of the extension package, the following is the default contents of this file:
{
	"name": "pro-api-sdk",
	"uuid": "",
	"displayName": "PRO API SDK",
	"description": "嘉立创EDA & EasyEDA 专业版扩展 API 开发工具",
	"version": "1.0.0",
	"publisher": "JLCEDA <support@lceda.cn>",
	"engines": {
		"eda": "^2.3.0"
	},
	"license": "Apache-2.0",
	"repository": {
		"type": "extension-store",
		"url": ""
	},
	"categories": "Other",
	"keywords": ["SDK"],
	"images": {
		"logo": "./images/logo.png"
	},
	"homepage": "https://pro.lceda.cn",
	"bugs": "https://lceda.cn/page/feedback?originPage=other",
	"activationEvents": {},
	"entry": "./dist/index",
	"dependentExtensions": {},
	"headerMenus": {
		"home": [
			{
				"id": "API SDK",
				"title": "API SDK",
				"menuItems": [
					{
						"id": "About",
						"title": "About...",
						"registerFn": "about"
					}
				]
			}
		],
		"sch": [
			{
				"id": "API SDK",
				"title": "API SDK",
				"menuItems": [
					{
						"id": "About",
						"title": "About...",
						"registerFn": "about"
					}
				]
			}
		],
		"pcb": [
			{
				"id": "API SDK",
				"title": "API SDK",
				"menuItems": [
					{
						"id": "About",
						"title": "About...",
						"registerFn": "about"
					}
				]
			}
		]
	}
}2
3
4
5
6
7
8
9
10
11
12
13
14
15
16
17
18
19
20
21
22
23
24
25
26
27
28
29
30
31
32
33
34
35
36
37
38
39
40
41
42
43
44
45
46
47
48
49
50
51
52
53
54
55
56
57
58
59
60
61
62
63
64
65
66
67
Now, we only need to change a few of the key values:
| Property | Type | Description |
|---|---|---|
| name | string | Extension name |
| displayName | string | Display name |
| description | string | Description |
| publisher | string | Publisher |
| license | string | Open source license |
III. Initialization Environment
Initializing the environment and starting the build are very simple single commands, in order to execute these commands you first need to start a VS Code terminal:
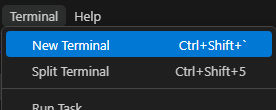
The terminal will appear below by default, and you can execute all the next commands from within the terminal. Now, we need to initialize the environment for the SDK project, including installing all the dependent libraries, initializing the runtime hooks, and more things that can be automated, and you'll need to execute the following commands from within the terminal:
npm installIV. Modify the Code File
In the default environment provided by the SDK, your entry code file is /src/index.ts.
If the file has the same suffix, we highly recommend and support writing EasyEDA Pro extensions in TypeScript by default, relying on the type system provided by TypeScript and our pro-api-types type definition file, you can easily get complete support for type inference and syntax hints.
INFO
If you still want to code in native JavaScript, you can rename /src/index.ts to /src/index.js and remove anything inside that doesn't conform to JavaScript syntax.
V. Build
After each code change, you should perform a build to get the latest extension package, and you may need to change the version number within the extension.json file before doing the build:
| Property | Type | Description |
|---|---|---|
| version | string | Semantic version number |
Then, execute the following command in the terminal to build the extension package:
npm run buildThe extension packages you build will be generated in the /build/dist/ directory.
TIP
The build will read the .edaignore file in the root directory, which controls what will be excluded from the package at build time, and has the same syntax as .gitignore.
Import Extensions to EasyEDA Pro
The import operation currently has a different location:
EasyEDA Pro V2
Top Menu Bar -> Settings -> Extensions -> **Extension Manager... ** -> Import Extensions
Import the .eext file you generated in the /build/dist/ directory during the last build.
EasyEDA Pro V3
The V3 version is not yet available, the following paths are subject to change at any time in the test environment:
Top Menu Bar -> Advanced -> **Extension Manager... ** -> Import
Import the .eext file you generated in the /build/dist/ directory during the last build.